View Other Posts

Disclaimer

All data and information provided on this blog is for informational purposes only. Oracleapps11idba.blogspot.com makes no representations as to accuracy, completeness, currentness, suitability, or validity of any information on this site and will not be liable for any errors, omissions, or delays in this information or any losses, injuries, or damages arising from its display or use. All information is provided on an as-is basis.Please use your discretion before taking any decisions based on the information in this blog.

Sunday, September 27, 2009

How to Install Oracle Applications R12 E-Business Suite

In this post i will discuss steps to install Oracle Applications R12 e-Business Suite.

First we need to create a staging area by unzipping all the zip files to create folders as given below.

  • docs
  • startCD
  • oraDB
  • oraAPPS
  • oraAS
  • oraAPPDB

This screen lists the components that are included in, or supported by R12 Oracle Applications. Click Next to continue.


   Use the Select Wizard Operation screen to select first option ‘install oracle applications release 12.1.1. This screen can be used for both new installations and upgrades. Based on the selection the Rapid Install wizard continues with the appropriate screen flow.


In this screen Provide your Metalink userID and password.


Configuration Choice screen, this indicate whether you will be using an existing Configuration file.In this screen you can specify Configuration file to use in Multi node Architecture, but if this is the first server in multinode architecture then select 'Create a new configuration'.


In this screen please specify Port Pool. Based on Port pool number oracle will assign port numbers to different Application services like http, forms,db etc..


In this screen please specify the database type,SID, Node name, Domain Name and Operating system for Database Server node. 


In this screen you need to specify server Name, Domain Name, Operating system, Application Owner and Group etc. 


In this screen please specify what services can be run on this Application server node based on your requirement. 


In this screen you can add additional servers to cater different services based on your requirement.


In this screen you need to specify server Name, Domain Name, Operating system, Application Owner and Group etc for additional Application server.


In this screen please specify what services can be run on this additional Application server node based on your requirement. 


At this point oracle will verify your configuration and if something is not correct it will give you an error and you may need to correct it before you start instllation.


This is the final screen before installation for your review.


In this screen click on Yes to start Installation.


This is installation screen where oracle will show you the installation progress.


Once Installation is finished Oracle will verify the system for Post installation steps.


And and Hurray you are done with the installation and now start exploring Release 12...

Monday, September 14, 2009

How to install Oracle Applications 11i e-Business Suite


  In this post i will discuss steps to install Oracle Applications 11i e-Business Suite version 11.5.10.2.


  First we need to create a staging area by unzipping all the zip files to create folders as given below.
  • docs
  • startCD
  • oraDB
  • oraAppDB
  • oraiAS
  • oraApps
  Next thing we need to make sure that all the OS related pre-requisite steps have been completed and all the required OS patches have been applied.


  Now start rapidwiz from startCD/Disk1/rapidwiz>./rapidwiz location ( don't forget to export DISPLAY parameter to valid x-server)


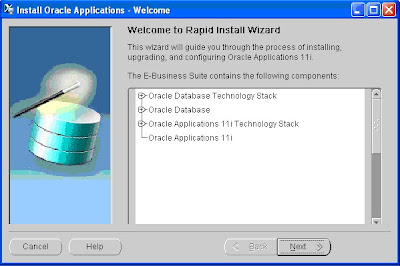
  First screen of installer will show you the list of components Rapidwiz will install as a part of Oracle applications 11i Installation. Click next to go the next screen.


   In the second screen you will have a choice to install a fresh Oracle Applications E-Business 11i or Upgrade to E-Business 11i from previous versions.


  In this screen you can specify Configuration file to use in Multi node Architecture, but if this is the first server in multinode architecture then select 'No'.


  In this screen you will get the option to select single node installation or Multinode installation. Based on your requirement please select the option.


  In this screen you can select Load balancing option if you have multiple Application tier like two or more Web tiers and two or more Admin Tier servers.


   In this screen please specify server name or Node name and Operating system for each Service like database, admin, concurrent and forms.
   If you are planning to use Shared File system please configure shared file system option in the screen only by clicking details button otherwise uncheck shared file system option.


  In this screen you need to specify the purpose of this instance. You can select Vision Demo Instance or you can select custom instance for your production,development or test purpose.


  In this screen you need to specify Oracle Database owner, group and file system (Mount points) architecture for binary files and database files.


  In this screen you need to specify Application Owner like applmgr and File System Architecture for all Application services. You can select single owner for database and Application if you are planning to install Vision instance only.


  In this screen please specify Domain Name, X-server Address and Port Pool. Based on Port pool number oracle will assign port numbers to different Application services like http, forms,db etc..


  If you are planning to use Multinode Architecture then you should save your configuration in some file which you will be using during other node installation.


  At this point oracle will verify your configuration and if something is not correct it will give you an error and you may need to correct it before you start instllation.


  This is the final screen before installation for your review.


  In this screen click on Yes to start Installation.


  This is installation screen where oracle will show you the installation progress.


  Once Installation is finished Oracle will verify the system for Post installation steps.


  And and Hurray you are done with the installation and now start exploring...


Wednesday, September 2, 2009

How to Configure Oracle Java Workflow Notification Mailer in Oracle apps 11i

Use following simple steps to configure Oracle Java Workflow Notification mailer in Oracle applications 11i


• Run $FND_TOP/sql/wfver.sql and review the output
• Check for invalid objects
• Generic Service Management (GSM) should be enabled in the system. Workflow mailer program runs as a service with in GSM.
• Verify if GSM DEBUG service run successfully without exceptions in the log from OAM.
• JDK1.3 or higher must be installed and configured on Concurrent processing node.

 JDK1.3 Home/bin/java -version


• Verify following variables for JDK version


 AF_JRE_TOP = $JDK1.3 Home
 AFJVAPRG = $JDK1.3 Home/bin/java
 AF_CLASSPATH = $JDK1.3 Home/lib/dt.jar:$JDK1.3 Home/lib/tools.jar:$JDK1.3 Home/jre/lib/rt.jar:$JDK1.3 Home/jre/lib/i18.jar: $JAVA_TOP/appsborg2.zip:$ORACLE HOME 8.0.6/forms60/java:$JAVA_TOP


• Verify if JMS libraries exist in AF_CLASSPATH.


 grep jar $APPL_TOP/admin/adjborg2.txt

Sample output should look like:


$ORACLE HOME 8.0.6/owm/jlib/jssl-1_1.jar
$ORACLE HOME 8.0.6/owm/jlib/javax-ssl-1_1.jar
$iAS HOME/rdbms/jlib/aqapi.jar
$iAS HOME/rdbms/jlib/jmscommon.jar
$iAS HOME/Apache/xsu/xsu12.jar
$iAS HOME/Apache/xsu/oraclexmlsql.jar
$iAS HOME/rdbms/jlib/xsu12.jar
$iAS HOME/lib/http_client.jar

  If the output is 0 (zero), it means that appsborg2.zip does not contain the JMS classes


• Create a IMAP Account in Lotus Notes with following information


User ID : WFMAILER
Password : WFMAILER
INBOX folder
PROCESS folder
DISCARD folder


Test your IMAP account


telnet testorcl.com 143
Trying 112.126.180.67...
Connected to testorcl.com.
Escape character is '^]'.
* OK Domino IMAP4 Server Release 5.0.11 ready Sun, 23 Nov 2003 10:26:49 -0800
1 login WFMAILER WFMAILER
1 OK LOGIN completed
1 select "INBOX"
* 23 EXISTS
* 0 RECENT
* OK [UIDVALIDITY 0] UIDs valid
* FLAGS (\Flagged \Seen \Answered \Deleted \Draft)
* OK [PERMANENTFLAGS (\Flagged \Seen \Answered \Deleted \Draft)] Permanent flags
1 OK [READ-WRITE] SELECT completed
1 select "DISCARD"
* 54 EXISTS
* 0 RECENT
* OK [UIDVALIDITY 6] UIDs valid
* FLAGS (\Flagged \Seen \Answered \Deleted \Draft)
* OK [PERMANENTFLAGS (\Flagged \Seen \Answered \Deleted \Draft)] Permanent flags
1 OK [READ-WRITE] SELECT completed
1 select "PROCESSED"
* 58 EXISTS
* 0 RECENT
* OK [UIDVALIDITY 4] UIDs valid
* FLAGS (\Flagged \Seen \Answered \Deleted \Draft)
* OK [PERMANENTFLAGS (\Flagged \Seen \Answered \Deleted \Draft)] Permanent flags
1 OK [READ-WRITE] SELECT completed
1 logout
* BYE testorcl.com IMAP4rev1 server terminating connection
1 OK LOGOUT completed
Connection closed by foreign host.

Verify SMTP server Configuration

telnet mailhost 25
MAIL FROM: wfmailer@orcl.com
RCPT TO: kapil@orcl.com
DATA
Subject: Test message from workflow (mailhost)
Hello Kapil
.
Verify that kapil@orcl.com receives an email from wfmailer@orcl.com . If not, then the SMTP server is not configured properly.


Configure Workflow Notification Mailer using OAM

Log on to Oracle Application manager


Navigate to Workflow manager from pull down menu


Click the Notification Mailer status icon to navigate to the Service Components page for notification mailers


In the Service Components page, select the Workflow Notification Mailer service component and click the Edit button


Leave all settings as a default in the first page


Click on the next button to go to second step. If you are using inbound mails then define Inbound Thread Count more than  0 or else 0. For Outbound Mail define Outbound Thread Count to 1


In the Inbound eMail Account region, enter the inbound mail server and the username and password for the IMAP e-mail account. Please remember userid and password is case sensitive. In the Outbound eMail Account region, enter the outbound mail server that the Workflow Notification Mailer will use.


In the Send region of the Edit Notification Mailer: Message Generation page, enter the address of the reply-to e-mail account that receives incoming messages and the base URL that identifies the HTML web agent that handles HTML notification responses.


All other configuration parameters for the Workflow Notification Mailer are set to default values.
After you finish setting the configuration parameters, go to service component page and click on Workflow mailer Service.


In the Service Instances for Generic Service Component Container page select start all from pull down menu and click on go button.


Go to Service component page once again and verify that the status of the Workflow Notification Mailer service component is now running.


In the next Post i will discuss Workflow mailer troubleshooting.

Tuesday, September 1, 2009

How to Find out Undocumented Paramaters in Oracle Database

Use following SQL Query to find out Undocumented paramater and their value.

SELECT xpi.ksppinm "Parameter Name",
xpi.ksppdesc "Description",
xcv.ksppstvl "Session Value",
xsv.ksppstvl "Instance Value"
FROM x$ksppi xpi,
x$ksppcv xcv,
x$ksppsv xsv
WHERE xpi.indx = xcv.indx
AND xpi.indx = xsv.indx
AND SUBSTR (xpi.ksppinm, 1, 1) ='_'
ORDER BY xpi.ksppinm;

How to Monitor Long Running Concurrent Requests in Oracle 11i

Use following Script to monitor long running concurrent requests in Oracle 11i


------------Start of Script-------------------------------------
#!/bin/sh
# Long Running Concurrent Requests
#


SPOOL_FILE=long_runn_conc.html
FINAL_FILE=Long_Running_Concurrent.html


pchk1=`ps -ef | grep ora_smon_$ORACLE_SID | grep -v grep | wc -l`


if [ "$pchk1" -eq 0 ]; then
     echo "WARNING: Possible database shutdown problem"
     exit 0
fi


echo "Content-Type: text/html" >> ${FINAL_FILE}
sqlplus -s apps/apps EOF
set echo off
set pagesize 120
set markup html on spool on
spool ${SPOOL_FILE}


TTITLE CENTER 'Concurrent Requests running for more than 20 minutes'


SELECT gv.inst_id "Instance Number",
gv.sid "Sid",
gv.serial# "Serial#",
fcr.request_id "Request ID",
substr(fcr.program,1,40) "Program" ,
fcr.phase "Phase",
fcr.status "Status",
to_char(fcr.actual_start_date,'DD-MON-RR HH24:MI:SS') "Start",
to_char(fcr.actual_completion_date,'DD-MON-RR HH24:MI:SS') "End",
ROUND( ( NVL( fcr.actual_completion_date, sysdate ) - fcr.actual_start_date ) *60*24, 2 ) "Time(Min)",
fcqtl.user_concurrent_queue_name "Concurrent Manager",
fcr.user_name "User Name",
substr(gvw.event,1,30) "Event"
FROM apps.fnd_amp_requests_v fcr,
gv$session gv,
gv$session_wait gvw,
fnd_concurrent_queues_tl fcqtl,
fnd_concurrent_processes fcproc
WHERE Phase_code ='R'
and fcr.oracle_session_id=gv.audsid(+)
and gv.sid=gvw.sid(+)
and gv.inst_id=gvw.inst_id(+)
and fcr.controlling_manager = fcproc.concurrent_process_id
and fcproc.queue_application_id = fcqtl.application_id
and fcproc.concurrent_queue_id = fcqtl.concurrent_queue_id
and fcqtl.language='US'
and ROUND( ( NVL( fcr.actual_completion_date, sysdate ) - fcr.actual_start_date ) *60*24, 2 ) > 20
order by 9 desc;


spool off
set markup html off spool off
EOF


if [ `grep -c 'no rows selected' ${SPOOL_FILE}` -eq 1 ]
 then
   rm ${FINAL_FILE}
   rm ${SPOOL_FILE}
 exit 0
fi


cat ${SPOOL_FILE} | grep -v 'rows selected' >> ${FINAL_FILE}


(echo "Importance: High"; echo "Subject: VGOP: Long Running Concurrent Requests"; cat ${FINAL_FILE})  | /usr/sbin/sendmail -F VGOP dbadmin@activision.com


rm ${FINAL_FILE}
rm ${SPOOL_FILE}

-------------End of Script-------------------------------------


Use following SQL to get more information.


SELECT   gv.inst_id "Instance Number", gv.SID "Sid", gv.serial# "Serial#", fcr.request_id "Request ID", SUBSTR (fcr.program, 1, 40) "Program", fcr.phase "Phase", fcr.status "Status",
         TO_CHAR (NEW_TIME (fcr.actual_start_date, 'GMT', 'PDT'), 'DD-MON-RR HH24:MI:SS' ) "Start",
         TO_CHAR (NEW_TIME (fcr.actual_completion_date, 'GMT', 'PDT'), 'DD-MON-RR HH24:MI:SS' ) "End",
         ROUND (  (  NVL (fcr.actual_completion_date, SYSDATE)
                   - fcr.actual_start_date )* 60* 24,2) "Time(Min)",
         fcqtl.user_concurrent_queue_name "Concurrent Manager",
         fcr.user_name "User Name",
         (CASE
             WHEN gvw.event = 'latch free'
                THEN (SELECT vl.NAME || ': Latch Name'
                        FROM v$latch vl
                       WHERE vl.latch# = gvw.p2)
             ELSE SUBSTR (gvw.event, 1, 30)
          END
         ) "Event",
         (CASE
             WHEN (gvw.event = 'db file sequential read' or gvw.event ='gc buffer busy')
             AND dbo.object_name IS NULL
                THEN 'Rollback Segment'
             ELSE dbo.object_name
          END
         ) "Database Object",
         fcr.argument_text, gvw.p1, gvw.p2, gv.sql_id,gp.spid
    FROM apps.fnd_amp_requests_v fcr,
         gv$session gv,
         gv$process gp,
         gv$session_wait gvw,
         dba_objects dbo,
         fnd_concurrent_queues_tl fcqtl,
         fnd_concurrent_processes fcproc
   WHERE phase_code = 'R'
     AND gv.paddr    = gp.addr(+)
     and gv.inst_id=gp.inst_id(+)
     AND fcr.oracle_session_id = gv.audsid(+)
     AND gv.SID = gvw.SID(+)
     AND gv.inst_id = gvw.inst_id(+)
     AND gv.row_wait_obj# = dbo.object_id(+)
     AND fcr.controlling_manager = fcproc.concurrent_process_id
     AND fcproc.queue_application_id = fcqtl.application_id
     AND fcproc.concurrent_queue_id = fcqtl.concurrent_queue_id
     AND fcqtl.LANGUAGE = 'US'
 ORDER BY 10 DESC;

How to Monitor Temp Tablespace usage and Sort Operations


Use following Script to monitor Temp tablespace and Sort Operations in Oracle Database.

------------Start of Script-------------------------------------


#!/bin/sh
# Temp Tablespace & Sort segments Usage
#

SPOOL_FILE=temp_seg.html
FINAL_FILE=Temp_Segments.html
echo "Content-Type: text/html" >> ${FINAL_FILE}
sqlplus -s "/ as sysdba" EOF
set echo off
set pagesize 220
set markup html on spool on
spool ${SPOOL_FILE}
TTITLE CENTER 'Temp Tablespace and Sort Segments Usage'


SELECT gvs.inst_id "Instance",
gvs.SID,
gvs.username "User Name",
NVL (gvs.status, ' ') "Status",
NVL (gvs.osuser, ' ') "OS User",
NVL (gvs.program, ' ') "Program",
NVL (gvs.module, ' ') "Module",
gsu.TABLESPACE "Tablespace Name",
SUM (gsu.extents) "# of Ext",
SUM (gsu.blocks) "# of Blocks"
FROM gv$session gvs,
gv$sort_usage gsu
WHERE gvs.saddr = gsu.session_addr
AND gvs.inst_id = gsu.inst_id
GROUP BY gvs.inst_id,
gvs.SID,
gvs.username,
gvs.status,
gvs.osuser,
gvs.program,
gvs.module,
gsu.TABLESPACE
ORDER BY 9 DESC;

spool off

set markup html off spool off
EOF

if [ `grep -c 'no rows selected' ${SPOOL_FILE}` -eq 1 ]
then
rm ${FINAL_FILE}
rm ${SPOOL_FILE}
exit 0
fi


cat ${SPOOL_FILE} | grep -v 'rows selected' >> ${FINAL_FILE}


(echo "Importance: High"; echo "Subject: $ORACLE_SID: Temp Tablespace & Segment Usage"; cat ${FINAL_FILE}) | /usr/sbin/sendmail -F $ORACLE_SID test@testorcl.com


rm ${FINAL_FILE}
rm ${SPOOL_FILE}


------------End of Script--------------------------------------